Saturday 19 February 2011

Tutorial for paperless scrapbook Layout

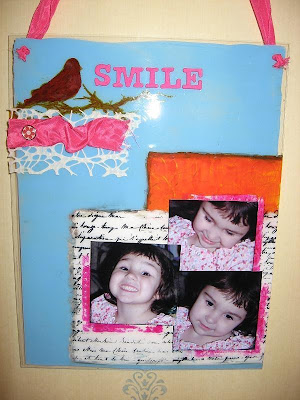
Here is the Tutorial for a paperless scrapbook layout I did. the page is done entirely using paint, stamps, inks and trims.


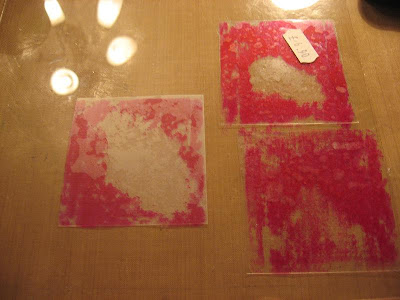
First I started with a clear acrylic A4 sheet bought at the Dollhouse store. First I place my pictures on the acrylic sheet to determine the placement of the elements. Once placed I took a piece of Cut n dry foam about the same size as the photos and stamped slightly shifted from where they would be placed using Stazon red(yes it came out pink). To create the texture on the stamp poke holes evenly using a piercer.
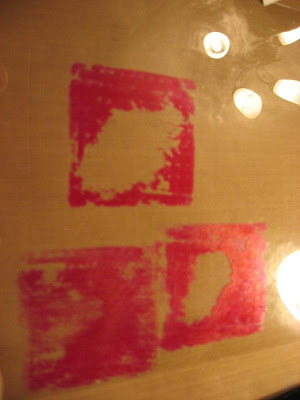
Next check to be sure the photos will lay as desired. If not you can always use Alcohol blending solution to clean your sheet and start over. Do not glue pictures down yet.
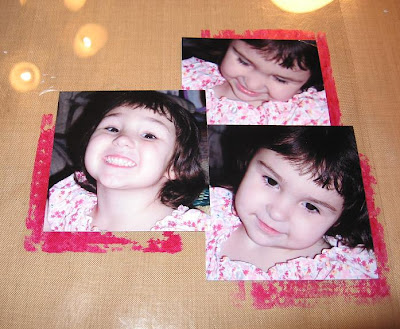
Next create a mask for the 3 blocks. I used scraps of plastic packaging. Just cut to size and spritz with water then lay in place over blocks.

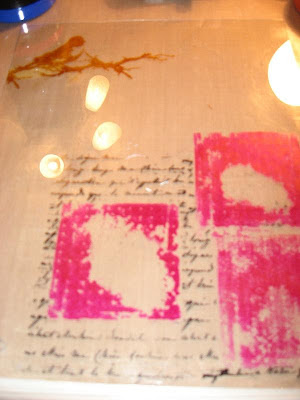
Now stamp the bird in top corner using Stazon brown and the script using Stazon Black at the bottom where you would like the first page to be. Just stamp over the blocks as they are masked. The stazon may stick to the mask, just replace it as needed. (stazon can be sticky)

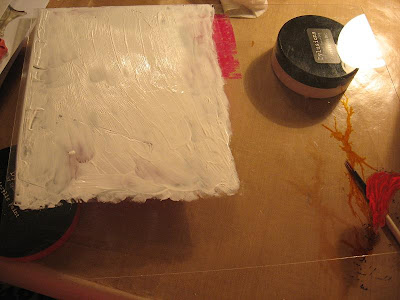
Now turn over the sheet and using white acrylic paint cover the scripted area. I used Dylusions white acrylic paint. Paint the bird in also using red acrylic from Dylusions.


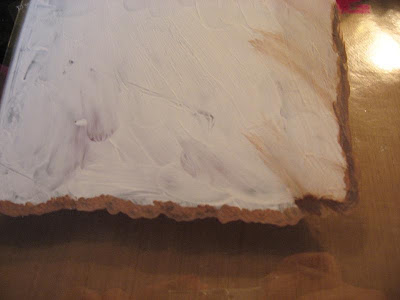
Next I mixed a bit of Walnut and black soot re-inkers with some white paint and ran along the edges of the white. Once dry wipe backwards lightly from edge going in with a baby wipe to create a distressed edge.


Now I added the orange Dylusions paint as another sheet also on the back of the sheet. Using a cap I created texture circles in the paint while still wet. Once dry do the same edging technique as shown above. the orange section will appear as behind the white script sheet.
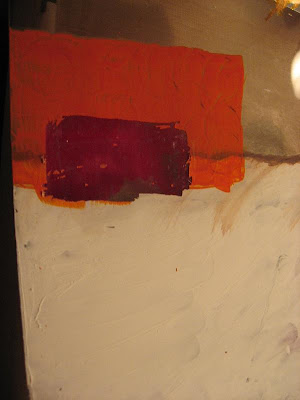


final paint step is to add the blue acrylic to the back completely covering all the other space on the page to about 1/8 of the edge of the edge.

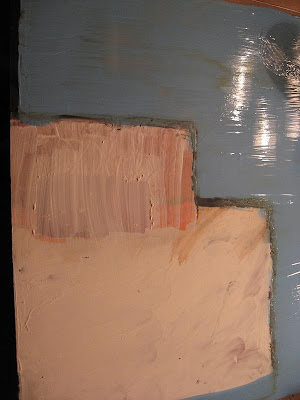
Final step is to flip page over when dry and add trim to side with adhesive. Using crop-a-dile punch hole and add brad. Add pictures. Punch holes in top corners using Crop-a-dile and add ribbon fr hanger.

Hope you enjoyed the tutorial. Thanks for stopping by to check it out and have a great day!
Angela


What else can you use Dylusions inks for part II

Remember that fabric and catsuit we had to dye using our Dylusions inks since the actual fabric dye did not work? The origial fabric came out cream after dying with the fabric ink(see the bit in the top corner).We had to use most of our dylusions spray inks to colour the fabric as a last ditch effort to make the fabric orange for a tiger as we were unable to find any faux fur in orange.

Well after 2 days to dry(I do not have a dryer), I finally got to make the costume and here is the completed costume. The ink was a life saver.


We added bits of the orange and blak fabric fur to the catsuit, made cuffs and ears and now you have a tiger. And not a moment too soon as Saturday was the dress rehearsal.

Doesn't she make an adorable Tiger? She could not wait till the rehearsal today. This costume is for a lion king ballet number they are doing. The kids all did great at rehearsal today. I cannot wait to see them in the show tomorrow. Hope you have a great evening and thanks for stopping by.
Angela

Wednesday 16 February 2011

Crafting Wednesday and more catching up.

Today was a fun day. A friend of mine came over and we crafted all day long(or at least till the kiddies got out of school).


First I played around with my new Dylusions inks catching up on my journal pages.
The Week 6 prompt was
Friends
  • Who, when, where.
  • What's your most memorable 'friend' story.
  • Use some kind of stencil decoration on your page.


So for my background I used Dylusions Acrylic paints and flower blossoms. I stamped the background with the flower blossom dipped in paint then I scraped the paint over top. Finally I used an alpha stencil and some white paint. The stamp is Tim Holtz and the cup is made from my napkin kit(it was a bowl and I added the handle). For my writing I chose to write about how I met my friend Vic(Victoria). We have been friends since early school.


Next was Week 7

And the prompt was Colour

  • What is your favourite colour and why
  • Use this as your main background for your page
  • Add a doodled border to your page

For this one I used Dylusions spray ink and flowers again to stamp with. I also added some splatters with a darker ink shade. The Bird is stamped along with the birdcage and the doodles are just drawn in black ink around the page.


Next up is my Paperless scrapbook page. Yep, not a shred of paper(unless you count the photos) the background is all painted and stamped on an acrylic sheet. The ribbons and trims are added on top. I will post tomorrow the how to tutorial for it.

And there is more....
Well this is not really creative but it is another way to use Dylusions spray inks. I have to make Belle a tiger costume for her dance show and we had the brill idea to ye the catsuit and fur orange since we could not find any. Well we dyed it "Goldfish orange" and it came out cream not so good.....What to do? Grab your Dylusions inks and spray away! We sprayed most of the fabric and the catsuit and it came out great. Now to just add the black trim stripes.


And lookie what arrived in the post last week! I won this great prize from The Stamp man blog hop! A set of starburst stains and video. Can't wait to play with them. Thanks Stamp Man!


Tomorrow is back to work and more sewing of Dance costumes for the show on Saturday. Thanks for stopping in and have a wonderful night. Angela


Tuesday 15 February 2011

What a week so far and blog candy winner....

Wow this week has been a crazy one so far. Sunday started with a call from my sister about some family things going on. That alone was enough to leave me sleepless for days.

I passed my driving test today! Yippee! Now I can drive again. How funny that I have been driving over 25 years in the states and after moving to England have to re-apply for a license. What an ordeal but it is finally over and I now have my freedom back. I have to say , I think the test is much harder over here and it is definitely harder to learn to change your driving habits.


So now I am playing a bit of catchup on my posting. I received this lovely Collage from Sam yesterday as part of the Pay it forward I am partaking in. Isn't it wonderful! I love the background and the colours are great. Thanks Sam!

Next I have a beautiful bunch of flowers I received tonight from Belles Dance teacher. She gave them to me for making the costumes for her.

Here they are almost finished. I have to say I think they were a bit more than I expected. They took so long to trim each one as they were over 3 meters round each. Finally they were all trimmed and ready for fittings by Monday. Today I finished up the last 2 for one of the boys in the earlier class and just Belles Tiger costume for Ballet is left.

Today after dropping Belle at dance we headed to the pub where I had a hot chocolate as usual. I then headed back to Dance while Dave ran an errand. Well I managed to lose my footing, stumbled and fell hard. I got both hands and both knees. OUCH! Here is the least bruised of the 2 although there are some really funny bumps on it now.

Here is the worse of the 2. Believe it or not it is not cut or bleeding. These are bruises under the skin. Very red , very swollen and very sore! As I am sitting here with my leg up writing this. Anyway, that was my fun story for the night. Of course my husband is telling everyone I had one to many at the pub. One too many Hot Chocolates or maybe it was the marshmallows and cream?????


OK so now for the moment you have been waiting for the winner of our blog candy by good old fashioned random draw. First I have to say thank you for all the wonderful comments. I have not yet had a chance to respond to all that I need to but I promise I will very shortly. Belle was kind enough to help me with drawing the name.


She mixed them up really well.


and the winner of the blog candy is.......


Sheetal Ahlawat

Congratulations Sheetal ! Please email me at Scrapbookcafe2@yahoo.com with your mailing address so I can get your prize out to you.

Now Belle decided we needed some more winners so she pulled out 2 more names and both of these people will receive a little something special from us too.
Congratulations
Sandy Ang
and
Poppet
Please email me your addresses girls and I will get your prizes out to you.
well I think it is time to attempt some sleep. Maybe I can top last nights 3 hours. and then again maybe not. Have a wonderful night and thanks for stopping by.
Angela


Friday 11 February 2011

A Swap for all Seasons Fabric Collage winter swap.

Here is the Fabric Collage I made for my swap Partner Valery in the Winter Swap at A Swap for all Seasons. I had never made a fabric collage before and the idea I had did not quite work the way I wanted. Valery liked Pinks, buttons, has 3 cats and liked a shabby style. So this was the final product


I sewed layers of CathKidston fabrics with a sheer white. Added some personal painted canvas pieces(I painted the cats). I hand sewed the flowers that were cut from another fabric piece. The tuling, feathers and buttons were added as trim along with the beaded fringe and ribbons. I was going to add beading along the edge of the flowers but it did not look right so I added Distress stickles to the edges. I also added a little gem topped pin in the tule . Valery liked it.

And here is a reminder of what My swap partner sent to me. I just love them both. She could not decide which to send so she sent me both. How sweet is that. I cannot decide which I like better. If you missed the original link for this post you can view all the details here.

Thanks to Linda over at A swap for all seasons for another wonderful swap. Can't wait for the next one........
Thanks for stopping in and have a wonderful day. Angela

Thursday 10 February 2011

Stamp Man Feb ATC swap.

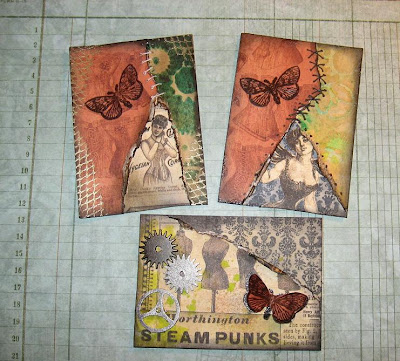
This month over at the Stamp Mans ATC swap the theme is SteamPunk. This one was a bit hard as I had no idea what to do. I had some Graphic 45 Steampunk paper I wanted to use so I worked from there and here is what I came up with.


The torn result started from a mistake I made on the first card and I sort of liked it. I used Graphic 45 Steampunk papers along with stamping and masking backgrounds.


For the first card I layed gears on the card and sprayed with Dylusion inks then removed them for a masking effect. I added some had stitching and printed papers. The butterfly is stamped from Flower Faries stamp set inked with black Perfect Medium andembossed with clear detail powder. the mesh stamo is from The Stamp man and embossed with fine gold powder.


The second card is very similar but behind the lady is a stamped background using Prima mini stamp. The stitching on this card is faux stitching with a fine black Copic pen.


The 3rd card is layered with Graphic 45 card bits and stamped background using Prima mini stamp. The butterfly is done the same as above then I added another layer to it for more of a dimensional effect. The geers are glued on this one too. I also dribbled some Dylusions spray ink on the card and blotted off.


Now for a little info on an upcoming retreat I am attending in March with Belle.


It is run by Janet and Michelle Whom I met on the stamp man blog. It is called Lovin'ink craft retreat and runs 25th-27th March 2011. they also have another in September. there are fun inky workshops and time to craft by yourself too. So if you fancy a fun weekend retreat be sure to stop by and check them out. they are also running a fantastic blog candy until the end of the month.

And Finally....I was going to post the Fabric collage I made for my swap partner Valery tonight but I am not positive she has seen it yet so I will wait another day just in case. It was supposed to be delivered today but just in case she missed the mail or had to travel I do not want to spoil it by posting before she opens it. I will post it as soon as I am sure she has seen it. Wel that is all for now. She skirts are almost done. The trim is taking forever though because they are so wide, but they are coming along. Don't forget to enter for my blog candy on the sidebar, you have until Feb 14.

Thanks for stopping by and have a wonderful day. Angela

Wednesday 9 February 2011

Fabric sampler swap - A Swap for all seasons

I am participating in A swap for all seasons Mini Fabric collage Winter swap. We were supposed to make a fabric collage for our partners and mail it by the 16th of February. For this swap I was paired up with the wonderful Valery. We Both finished and mailed ours early.


Today I received a nice little package from Mr Postman today. It was my fabric collage from my swap partner Valery. Now I had all intentions to wait to open it but it was so tempting... and lookie what I found inside.....


First there was a beautiful handmade tag with a nice little note from Valery. Then there were 2 packages so I just had to open the first.
So here was my collage I received from Valery. Isn't it beautiful. I love the colour and everything about it and look at the back. Isn't that sweet? Love the Butterfly.


But wait there is more....Another package. Valery made me 2 fabric collages. Isn't this one just fab too? love the bird it is just striking.


And again a personalization on the back....


And here they are both together. Just lovely aren't they? Thanks Valery! I love them.


WARNING.....SPOILERS AHEAD.

So now what did I send to Valery? Well because she did not receive it yet I cannot post the actual full project but I will post some snippets. Valery if you are reading their are spoilers beyond this point so please stop here....at least till tomorrow.
So now onto my project. .....Here it is all wrapped up ready to ship.....


and here are some snippets of my collage. I will post the full picture tomorrow.

I tried to make it in a shabby style with pinks and greens. I also painted some cats on canvas pieces to customise the piece. That is all I can say for now. Tomorrow I will post the full picture.
So now I am off to work on more costumes. The 12 white satin skirts are almost complete. Just edging and trims now. After that I have 3 more costumes to make. 1 mickey mouse, 1 old fashioned boy's swim suit and a tiger. No sleep for me tonight.
And I am off. Thanks for stopping in and don't forget there is still time to enter for my blog candy here. Have a wonderful evening. Angela


Saturday 5 February 2011

Very exciting news.....

Well the post man came today and brought me a letter with some wonderful news! It all has to do with this card I made last year for a contest.

Above is the front of the card I made 2 of my hand crafted doggies coming out of the card and below is the inside with a third.
The sentiment was also written by me. The printed papers are from Inaginisce.

So as you may have guessed, my card was the winner of the contest. Now I had forgotten about it being so far away. I just thought that they did not like the entry or there were too many to respond too. But I was in shock reading the letter today. I read it so many times I lost count. when I gathered the mail at the door and skimmed through it I was not going to open it right away thinking it was a soliciting mail but something urged me to open it. Maybe it was the purple handwriting on the envelope. I am still in shock. The prize is awesome but I do not want to mention any more on it until I have all the details. Hopefully next week. I can tell you though that I am doing a happy dance. It has to do with london, crafting and ...... ok I have said too much already. I will post more as soon as I have the details. promise. For now I will have to leave it there.
Wishing you a wonderful weekend and ovely saturday. Thank you for stopping in.
Angela

Thursday 3 February 2011

New ATC's

Here are the ATC's I created for Feb and March swaps at UK Stampers.

The theme for February was "1 each with the word - Heal, Hope & Happiness". Here is my take:


I used Stampin up stamps coloured with Promarkers. I accented the cards with my faux sand and glossy accents. The pier is made of chipboard cut and inked. To get the wave detail I added a bit of pearl Smooch ink to the top of the glossy accents while wet.

The next set of cards I did are for the March swap(I am sending them both together). The Theme here was "In the Woods". When I think of that I think of fairies so here is my take.


I inked the background using distress inks. I then stamped the trees using Tim Holtz bird branch stamp and Walnut Distress ink. I used Tim Holtz's spots stamp with Peeled paint and forest moss distress ink for the tree leaves and the Floral corner for the flowers on the bottom. the fairies are misc dollar store stamps from Michaels(in the states) coloured with Distress inks. I accented the wings and other bits with stickles.

Well thats all for now. Tomorrow is another day although I must finish this sewing. I must I must I must.... don't forget to enter for my blog candy. Have a wonderful evening and thanks for stopping by. Angela

Wednesday 2 February 2011

Valentines cupcake box.

I created this cupcake box for a Valentines challenge over at UKstampers.


The box is made with Basic Grey specialty paper and red card embossed with the edge of Stampin up flower heart stamp. the flower and leaves are also made using the Stampin upflower heart stamp held together with a pearl brad in the center. There is also a clear insert to go inside the box to hold the cupcake. I am going to give this to my daughter for valentines day with a special cupcake.

I also worked on some ATC's today which I will post tomorrow. For now I have to get back to my sewing. Don't forget about my blog candy you can enter here and check here for a way to get 2 more entries, Thanks for stopping in and have a wonderful day. Angela

I'm an Auntie again and Journal week 4 and 5.

First off I need to share with you a picture of my new little nephew Albert. My brother and his wife have waited many years for a child and they have been blessed with this beautiful little Angel. I am so happy for them and cannot wait to actually visit with my new nephew in person although being over 3000 miles away that will have to wait until out next trip across the pond. Isn't he just a doll! Those cheeks just look so pinchable.....
So no onto other things....
I finally got my Journal for the weekly challenge at UK Stampers caught up. Week 4's prompts was Sweets along with the following :

List 5 sweets you remember from your childhood.
Where did you buy them and what did they cost?
Include some kind of sweetie wrappers on your page.


so here is my page...

I used Dylusions inks to colour white paper and cut it up into small bits. I also cut up a gum wrapper. I then placed a double sided sticky paper over my entire page and placed the bits like a mosaic. once complete I covered the sheet with clear embossing powder and brushed off excess witha paint brush. I then heat set the embossing powder and glossed the tile bits. I added the journaling and inked the edges.


Week 5 prompt was Perfect Day


Along with the following:
What is/ would be your perfect day?
Include a picture on your page.
Use some stamping on your page.


I used a Basic Grey diecut sheet as a stencil and coloured with Dylusions ink and Distress ink. the stamps are from Tim Holtz. the picture used is from a sheet of pics received from a Ranger class. The title is stamped on a napkin and adhered to the page. the stitching on the side of the picture is doodled on.


My journaling is placed on a card and slid in behind the picture and held on top with a paper clip.


Tomorrowbrings another crafty day. I am hoping to get caught up on my ATC's and other projects. dont forget to enter for my blog candy here and you can get an extra entry here. thanks for stopping in and have a wonderful evening. Angela