Tuesday 29 November 2011

what to do with a bean tin?

What to do with a tin bean can? Well the challenge over at The Try it on Tuesday blog is to alter a Tin. At first the challenge was to alter a Bean tin but then it was decided to alter any kind of tin. Of course I had already started my Bean tin so here it is...

I had a few different ideas but after the dog broke my nose Monday morning when i picked her up from the kennel after returning from Holiday(No it was not really her fault, she jumped as I leaned over to check on her), I decided to keep it simple. Thankfully my nose is not too bad although sneezing is out of the question. Anyway, for my tin I decided to use my Hero Arts tree stamp I just received from The Stamp Man along with the fairy stamp which is also from The Stamp Man last summer. The leaves are from a Tim Holtz stamp set. I lined the top of the tin with a fuzzy fiber.

Now this week we are generously being sponsored by The Craft Barn once again Who have a £15 voucher for one lucky entry. All you have to do is to have a go at altering a tin then link it up on the Try it on Tuesday blog. There is lots of fab inspiration from the rest of the team just waiting to be checked out so do go have a visit.

Now I am off to rest my aching head. Thanks for stopping in and have a lovely day. Angela

Tuesday 22 November 2011

Shrink Plastic

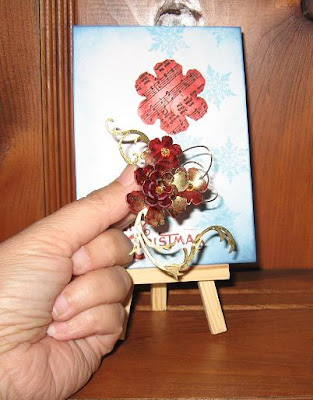
The theme this week at The Try it on Tuesday challenge Blog is "Honey I shrunk the Plastic" or Shrink Plastic in more general terms. We would like to see you use some type of Shrink film in your project. For my project I used shrink plastic to create a pin that attaches to a gift card.
I die cut the shrink film using Tim Holtz Tattered Floral die then stamped using the music sheet from Tim's Christmas stamps. I then shrunk and colored the flowers using red Promarkers. The swirls are also cut from shrink film and heated into a shrunken shape. They are colored using gold ink and gold stickles. The pieces are then all glued together and adhered to the pin. The card is done using masking techniques with the scraps from my flower.

Now if you head on over to the TIOT blog you can get some more great inspirations for working with Shrink plastic from the Design team and our wonderful guest Designer Corry.

Wishing you a wonderful week and thank you very much for stopping by. Angela

Friday 18 November 2011

New Challenge at The Stamp Man

The new challenge at The Stamp Man this fortnight is all about Tim Holtz Tags of Christmas techniques. We want you to use one of Tims Tags of Christmas as inspiration for your own project. It does not have to be a tag as ling as it is inspired by one of Tim's. You can find a link to them on Tim's blog. or on The Stamp Man Challenge Blog.


For my inspiration I used Tims tag #11 from 2010 .

Now if you head on over to The Stamp Man Challenge blog you will find lots more wonderful inspiration from my team mates. Then its your turn to show us your project. Remember to include a link to the tag that inspired you. Once lucky winner will win a £10 voucher to The Stamp Man shop so Good luck and we cannot wait to check out your projects.

Thanks for stopping by and have a wonderful day. Angela

Wednesday 16 November 2011

Another layout from the weekend.

This is another Layout I did over the weekend. It is a jack of Mandy's(yes I really mean it this time, sorry the other was a jack of Julies) from Scrap jacked. I loved these funny pictures of Belle with her Halloween costume on the day of a party at school. Her friend Casey was not dressed as she did not go. I had told Belle I did not have time to make her the vampire costume so she would have to be something simple but then surprised her with it that evening after spending all day making it. She loved it but quickly abandoned the teeth.

Thanks for stopping in and have a wonderful day. Angela


Tuesday 15 November 2011

New Challenge up at Try it on Tuesday

The new challenge is up at Try it on Tuesday and the theme this week is "Wish you were here" which can be interpreted in a variety of ways as you will see from the Design team and our wonderful guest designer Nikki.

For my card I wanted to play around with some acetate frames I had from My Minds Eye years ago. I stamped my sentiment using a Stampotique stamp on the frame and layered it above the image of my Stampotique Angel . the clouds are done using bubble wrap dipped in Dylusions white paint. I also layered the wings on the Angel and glittered them although you cannot see that in the photos. I forgot how hard it was to photograph acetate.


Hope you enjoy it. Now its your turn to hop over to the Try it on Tuesday blog and show us your interpretation of the theme. We cannot wait to see them.

Thanks for stopping by and have a wonderful day. Angela

Monday 14 November 2011

After a crafty Saturday

This is one of the layouts I did this weekend at the girls get together. Once a month a bunch of us try to get together at a local store and craft away. I jacked a layout from Julie over at Scrap Jacked. Scrap Jacked is a great place to get inspirational ideas for your layouts by jacking one of their designers. This month they have added a bunch more designers so there are inspirations abound.
***oops, I mistakenly said originally that I jacked Mandy's layout but it was Julies. I got them mixed up. So Sorry***
I chose to use a pic of Sophia our first foster. She was adopted a few weeks ago.
Here she is with Sunflower. They got along great.
and shared everything. Sunflower just loved her.
even Sunflowers crate.

then we got a new foster Maddy but she only stayed a little while before moving to her new home.
Maddy and Sunflower hit it off right away too.
And now there is Lexie our 5 year old Rottie. She is our newest Foster and such a sweetie.

Well now I had better roll on and try and get a little blog hopping done. Thanks for stopping by and have a great day. Angela

Tuesday 8 November 2011

Nothing like waiting till last minute.

Like I did with this project for the Stampotique Designers Challenge. The theme this time was to alter a Poison Bottle so I decided to alter a little bottle with Fairy Wish dust in a little altered book.
Here is the cover. Hope you like it. I used Stampotique heart flowers and Angel stamps as well as bits from a sentiment stamp from Stampotique too.

Thanks for stopping in and have a lovely day. Angela

New challenge for Try it on Tuesday.

The new challenge is up on Try it on Tuesday and the theme this week is "Peel offs" you know those lacey type metallic stickers we all seems to have bought at one time or another. We want to see your tags using Peel Off stickers. For my tag I used Christmas Peel off stickers as masks then layered them on recycled plastic and colored the backs with Alcohol inks for the dangling ornaments. The branches are stamped using Tim Holtz Winter Sketchbook stamp set and the inks are Tim Holtz Distress. The stars are also from the same Peel Off package.

Now hop on over to the Try it on Tuesday blog for some more wonderful inspiration by my team mates then show us your tags. Remember no cards this week as it is a tag only week. Thanks for stopping by and have a lovely day. Angela

Friday 4 November 2011

New challenge at the Stamp Man

Wow I cannot believe it has been another Fortnight already. I have been so busy with Belles Communion that the time has just flown.
The new challenge is up over at The Stamp Man and the theme is "Collage". What do we mean by "collage" you ask? Well it is a mix of images and possible mediums to create a semi cohesive background. For my project I created a card using the USARTQUEST Napkin collage kit. I have layered several images on the background using the napkins to layer them within the embossing and inking. I have also created a tutorial for this project so you can click here to see it.

Now we would like to see your "Collage" creation. Remember the winner gets a great Gift certificate to use at The Stamp Man shop. Now if you head over to The Stamp Man challenge blog you can see all the other wonderful inspirational pieces created by the team and share yours with us using the link tool. We cannot wait to see them.

Thanks for stopping in and have a great day. Angela

Napkin Collage tutorial


US Artquest Napkin Collage Tutorial
This is the wonderful set of goodies you get inside the USARTQUEST Napkin Collage kit. There are ATC cards, Glitter, Adhesive, Brushes, Sponge and cup as well as a selection of vividly colored beautiful napkins. The napkins will vary per kit but all are wonderfully designed and selected. Now what to do with all these goodies you ask? Well stick around and I will show you a little tutorial on using the kit to its full advantage.

I am going to create a winter card using the supplies in the kit as well as incorporating some Tim Holtz Stamps, Inks and a few other things.

First I start by preparing my card background. For this I used the mesh stamp from the Aspects of Design Christmas I set. I stamped the image and heat embossed using Detail Gold Embossing Powder.
Next I added Some color using Tim Holtz Distress inks and cut n dry foam.
Now onto the napkins. This one was in the first kit I bought. I love the bright birds on them. I cut out the birds to use in my card.
The backs of the napkins provide wonderful blank slates for adding your own images such as stamping or lettering. I removed the back here by peeling it carefully away.
To stamp on it use a quick set ink such as Stazon and stamp your image directly to the napkin. Do not leave it there too long as it will cause the ink to bleed. Just stamp and remove quickly. Here I used Tim Holtz Winter Sketchbook stamp set.
I also stamped some more using Tim Holtz Holiday Wishes stamp set.
Next to prepare the images to add to the card I tear them out of the napkin. You can cut of tear them as each will give a different effect. Cutting will leave a edge around the napkin once added into place whereas tearing will let the image blend in.
Now its time to start putting everything together. To adhere the napkins I will use the Perfect Paper Adhesive included in the kit. For my card I stamped some of the Pine image on to go under the bird. Once my ink was set I place my napkin image where desired and dip the sponge in the adhesive.
Press up and down on the image allowing the adhesive to soak through the napkin to the card. I did this throughout the card because I used a gloss adhesive and wanted the entire image to look cohesive. If you are just adhering the image you can use the paint brushes and add a bit of glue to the underside of the napkin then place down and carefully paint the adhesive on top of the image. If doing this be careful as the image is vary easy to tear. Since the napkin is layered you can also control the translucency of the image by removing the layers similar to the way we removed the back bit of the napkin. You can then save these bits for future use with stamping. For my bird I used all the layers.
Next I started to add the background pieces. These have been torn to be layered into a collage effect. I add them the same way using the glue and the sponge.
I keep layering them until I get the desired look I want. Don't worry about trimming them off just yet. Once they are dry you can trim up the edge of the card to remove the excess. Notice how the colour of the ink and the embossing comes through the stamped images.
Finally I add some of the extra bits of napkin left from when I cut of the bird. this will add a little different type of branch pattern with a hint of color.
Once I have everything put together I added a little finishing touch with the Metallic paint included in the kit.
And the finished project. See how easy that is. The napkin technique is great for adding titles or sentiments also as you can stamp them on the napkin first getting them just right before adding them to the card or project.
Hope you enjoyed the Tutorial!

Angela